Table of Contents
Considering plastering over Artex but unsure of the process or potential challenges?
This article provides insights into what Artex is, why it is used on walls and ceilings, and whether you can plaster over it.
We also discuss the steps, tools, and materials needed for plastering over Artex, as well as alternatives like skimming, covering with drywall, or using texture paint.
Learn about the benefits and potential challenges of plastering over Artex to make an informed decision for your home renovation project.
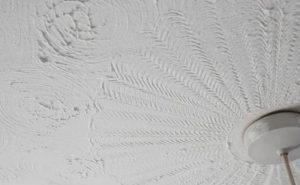
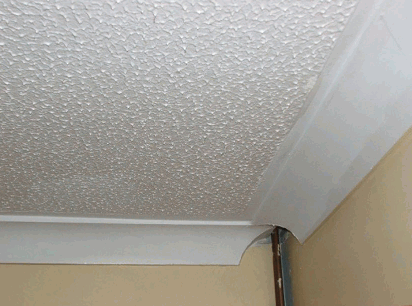
Artex is a textured surface coating that was popular in the 80s and early 2000s, commonly used on ceilings and walls for decorative purposes. It is a specialized plastering technique that creates unique patterns and designs, often found in older homes.
One of the defining features of Artex is its versatility, allowing for a range of design variations from swirls and stippling to geometric shapes and floral motifs. This texture not only adds visual interest but also helps to hide imperfections on surfaces.
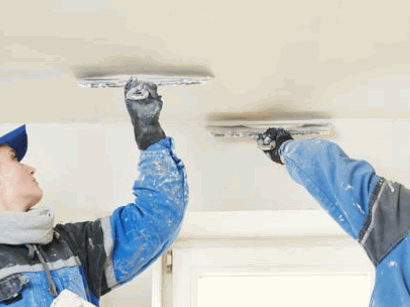
DIY enthusiasts often experiment with Artex in their home improvement projects, while tradespeople use it to add a touch of character to residential and commercial spaces. When applying Artex, professionals typically use dust sheets to protect the surrounding area from any mess or drips, ensuring a clean and tidy work environment.
Artex was often used on walls and ceilings as a cost-effective way to add texture and visual interest to a room. It was popular as a means to cover imperfections or damage on the surface, providing a quick solution for homeowners.
One of the reasons behind the preference for Artex on walls and ceilings lies in its ability to enhance the overall look of a space in a unique and artistic manner. The intricate patterns and designs created by Artex can transform a plain surface into a visually captivating focal point. Artex's versatility and compatibility with various materials such as vinyl paint make it a versatile choice for homeowners seeking to customize their living spaces.
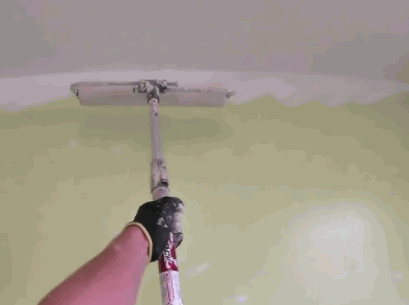
Yes, it is possible to plaster over Artex surfaces to achieve a smoother finish and modernize the look of the walls or ceilings. This process involves applying a bonding coat, followed by a skim coat, using the right tools and materials.
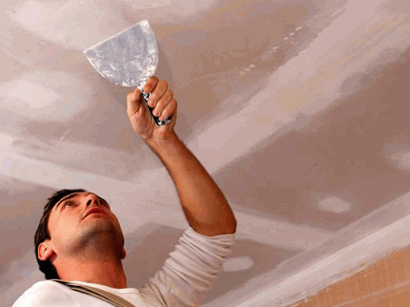
While it might seem daunting, plastering over Artex is a feasible DIY project that can significantly transform the aesthetics of a space. Skim coating is a meticulous process that requires attention to detail. To start, it's crucial to prepare the surface by cleaning it thoroughly and applying a primer like PVA to ensure proper adhesion of the plaster.
Next, mix the plaster to a creamy consistency and start applying the bonding coat evenly across the Artex surface using a trowel. Once the bonding coat sets, proceed with the smooth skim coat application, using a different trowel or float to achieve a seamless finish.
Take a look: How To Repair Big Holes In Plaster Walls
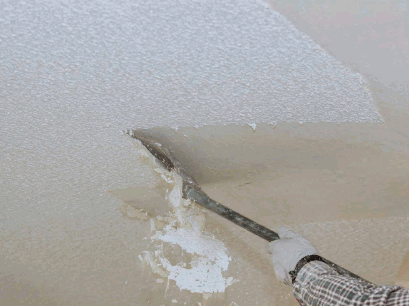
The process of plastering over Artex involves first applying a bonding coat to firm up the surface, followed by a skim coat to flatten the high points and angles. A second coat may be needed for a smooth finish, ensuring proper water suction to avoid any issues.
When applying the Bonding Coat, it is crucial to ensure it adheres well to the Artex surface, creating a strong base for further layers. The skilled plasterer will then expertly apply the skim coat, using techniques to achieve a level surface, diminishing any roughness or irregularities. Addressing the high points meticulously is essential as it contributes to the overall smoothness and quality of the finish.
The application of the second coat plays a significant role in providing that flawless appearance desired in plastering over Artex. To guarantee the best results, acknowledging and managing proper water suction becomes imperative to prevent issues like cracking or drying inconsistencies.
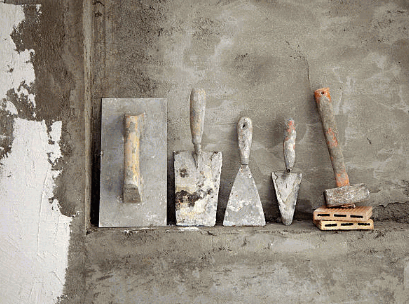
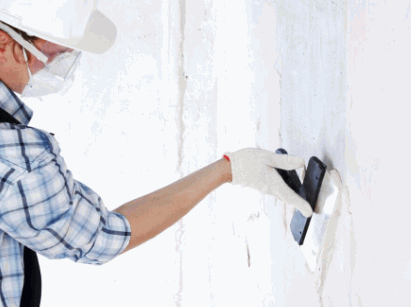
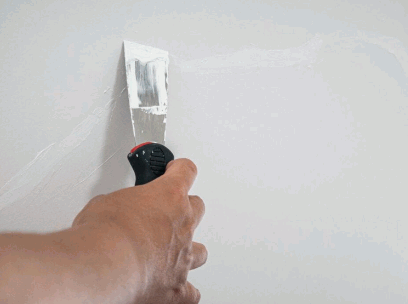
To plaster over Artex, you will require essential tools such as a trowel for application and smoothing, along with materials like PVA to ensure adhesion. Dust sheets are necessary to protect the surroundings during the plastering process.
Using a trowel allows you to spread the plaster evenly over the textured surface, achieving a smooth finish. PVA acts as a bonding agent, enhancing the grip between the new plaster and the existing Artex. Employing dust sheets safeguards furniture, floors, and walls from debris and splashes, ensuring a tidy workspace post-plastering.
For those seeking professional assistance, tradespeople possess the expertise to efficiently plaster over Artex with precision. Platforms like MyJobQuote offer a convenient way to connect with skilled professionals to streamline your plastering project.
While it is not mandatory to remove Artex before plastering, it is crucial to assess the condition of the surface. Smoothing out the high points and addressing any loose areas can ensure a better finish, especially if the Artex patterns are not desired.
For DIY projects, evaluating the Artex texture is key.
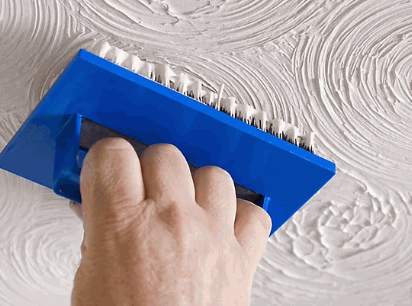
Tools like water brushes can be helpful in managing intricate patterns.
Before plastering, using a scraper or a textured coating removal tool can assist in preparing the surface effectively.
It's essential to create a smooth base for the new plaster to adhere to.
Checking for asbestos in older Artex is vital for safety reasons.
Proper preparation ensures a seamless transition to the new finish, whether you choose to keep or remove the Artex.
If plastering over Artex is not the preferred option, there are alternatives available. Skimming over the Artex, covering it with drywall, or using texture paint can provide different solutions to enhance the surface.
Skimming involves applying a thin layer of plaster over the Artex surface to create a smooth finish. This method is efficient in covering imperfections and creating a fresh look without removing the existing texture completely.
On the other hand, covering Artex with drywall is a more involved process that requires attaching sheets of drywall over the textured surface before finishing with joint compound and paint.
Alternatively, using texture paint offers a simpler solution by adding a new texture on top of the existing Artex, providing a decorative finish while covering the surface imperfections.
Skimming over Artex involves applying a new coat of plaster or compound to create a smooth surface. Proper water management and suction control are crucial during this process, ensuring a flawless finish that may require professional assistance from tradespeople.
Skimming is a meticulous task that involves applying thin layers of plaster or compound, known as skim coats, to gradually cover and smooth out the textured Artex surface. This method not only improves the aesthetics of the wall or ceiling but also allows for easier painting or wallpapering.
For complex skimming tasks, it's best to consult experienced professionals who have the expertise to handle water and suction challenges effectively.

Covering Artex with drywall involves installing new wall or ceiling panels over the existing textured surface.
This process allows homeowners to effectively conceal the rough and outdated Artex surface, creating a smoother foundation for a revamped look in their interiors. By incorporating drywall, individuals can easily camouflage any imperfections that may exist, such as bumps or uneven sections within the existing Artex texture. The added insulation provided by the new drywall layer contributes to better energy efficiency in the space.
Applying texture paint over Artex surfaces can offer a quick and convenient way to refresh the appearance without extensive plastering. Texture paints provide a unique finish and can be professionally applied by tradespeople for a polished look.
Texture paint offers various benefits beyond just its decorative appeal. This type of paint is known for its versatility, as it can easily conceal imperfections on the surface and create a textured effect that adds depth to the walls.
One of the significant advantages of texture paint is its ease of application. Unlike traditional plastering methods, which can be time-consuming and messy, texture paints can be applied efficiently, saving both time and effort.
Plastering over Artex offers numerous advantages, including achieving a smoother and more modern aesthetic for the walls or ceilings. This process makes it easier to paint or wallpaper over the surface, while effectively concealing any imperfections present.
Opting for plastering ensures that your walls or ceilings become more durable and resistant to wear and tear over time. The versatility of plaster allows for customization with various textures and finishes, adding depth and character to your living space. By covering Artex with plaster, you eliminate the need to constantly repair or maintain the textured surface, saving both time and resources in the long run.
By plastering over Artex, you can achieve a significantly smoother and more contemporary appearance for your walls or ceilings. Eliminating the textured finish can create cleaner lines and angles, enhancing the overall visual appeal of the room.
The process of plastering over Artex not only smoothens the surface but also provides a perfect canvas for painting or wallpapering, ensuring a flawless final look. The modern aesthetics brought about by the smoother finish exude a sense of sophistication and elegance, transforming the space into a more refined environment.
Plastering over Artex creates a suitable surface that is easier to paint or wallpaper over, providing a blank canvas for your decorative choices. The smooth finish ensures better adhesion of paint or wallpaper, which is particularly essential for vinyl paint applications.
A plastered surface allows for greater customization options as it can be easily textured or tinted to match your desired aesthetic. The even and flat nature of the plastered surface eliminates any unwanted textures or patterns that may show through when painting or wallpapering. Its durability also ensures that your paint or wallpaper will adhere firmly for years to come, reducing the need for frequent touch-ups.
One of the key benefits of plastering over Artex is the ability to conceal imperfections present on the ceiling or walls. Using the right techniques and materials, such as PVA for bonding, can ensure a flawless finish with professional assistance from tradespeople.
Plastering acts as a versatile solution, not just by providing a smooth surface but also by masking imperfections that might be present, giving a seamless look. The process involves applying a thin layer of plaster over the existing surface, covering any bumps, cracks, or uneven areas.
The use of PVA adhesive is crucial in the plastering process as it improves the adhesion of the plaster to the surface, ensuring a strong bond that prevents cracking or peeling over time.
While plastering over Artex can yield excellent results, there are potential challenges to consider. Achieving a truly smooth finish may be difficult, and there is a risk of issues like cracking or peeling due to the nature of the process.
It's essential to address the existing texture of the Artex, as its uneven surface can make achieving a flawless result quite demanding. The depth of the texture can affect the thickness of the plaster needed, adding complexity to the application process.
Time and labor-intensive, this task requires patience and precision to avoid imperfections or uneven spots. Proper preparation, including cleaning, priming, and applying multiple layers, is crucial to ensure the durability and longevity of the new finish.
One of the main challenges of plastering over Artex is the difficulty in achieving a uniformly smooth finish across the entire surface. Factors like water management, proper suction control, and precise troweling techniques play a crucial role in addressing this issue.
Artex surfaces can be particularly problematic due to their textured nature, which can lead to uneven adhesion of the new plaster. When the water content in the plaster mix is not carefully monitored, it can result in shrinkage and cracking, affecting the overall finish. Controlling the surface's suction through priming or using bonding agents is essential to prevent the plaster from drying out too rapidly, leading to a patchy appearance. Applying the right troweling technique, like feathering the edges and maintaining consistent pressure, is key to achieving a seamless surface without visible imperfections.
During the plastering process over Artex, there is a risk of issues such as cracking or peeling, especially in areas with high points and angles. Applying a second coat carefully and addressing these irregularities can help mitigate these challenges.
When plastering over Artex, the existing texture can present a unique set of challenges. High points and angles on the surface create areas where the plaster may not adhere as well, leading to potential cracking or peeling over time. To combat this, it is crucial to thoroughly assess the surface before applying the first coat of plaster. By smoothing out any pronounced fluctuations in the texture and building up the layers gradually, you can create a more uniform and durable finish.
Plastering over Artex can be a time-consuming and labor-intensive process due to the meticulous nature of achieving a flawless finish. Preparing the surface, managing water content, and ensuring proper protection with dust sheets are essential steps that contribute to the overall effort.
Surface preparation is crucial as it sets the foundation for the plaster to adhere smoothly and evenly. This involves filling in any cracks or holes, sanding down rough patches, and ensuring a clean, dust-free surface. Adequate water management is key to achieving the right consistency in your plaster mix, resulting in a workable texture for application.
When plastering over Artex, it's vital to protect surrounding areas from potential splatter and debris. Utilizing dust sheets or plastic coverings can help contain the mess and make cleanup easier. Investing time in these preparatory measures ultimately pays off in the quality of the final outcome.