Table of Contents
Are you tired of staring at unsightly holes in your plaster walls?
In this article, we will explore why plaster walls get holes, what tools you need for repair, and how to prepare the area for a seamless patch job.
We'll guide you through each step of the repair process, from cutting out the damaged area to applying plaster or joint compound.
Plus, we'll share expert tips for finishing and painting the repaired area. Grab your tools and let's get started!

Plaster walls develop holes due to various reasons such as structural movement, impact damage, or age-related deterioration. Understanding the underlying causes of these holes is crucial for effective repair and maintenance.
Structural movement, which can be caused by settling foundations or changes in temperature and humidity, exerts constant pressure on plaster walls. This pressure over time can create cracks and eventually lead to holes. Impact damage, whether from furniture bumping against the walls or accidental hits, weakens the integrity of the plaster, making it more susceptible to developing holes. As plaster ages, it becomes more brittle and prone to crumbling, increasing the likelihood of holes forming.

Repairing big holes in plaster walls requires specific tools such as plastering trowel, fiberglass mesh, joint compound, and sanding equipment to ensure a seamless and durable repair.
Each of these tools plays a crucial role in the restoration process. The plastering trowel is essential for spreading and smoothing the plaster over the damaged area. Fiberglass mesh provides stability and reinforcement to prevent future cracks. The joint compound acts as the bonding agent, filling in gaps and creating a stronghold. The sanding equipment helps in achieving a smooth finish by leveling the repaired surface. These tools combine to deliver a professional finish and restore the integrity of the wall effectively.

Preparing the area for repairing plaster walls involves cleaning the surface, removing loose debris, and creating a stable base for the patching process to ensure a strong and lasting repair.
Start by carefully inspecting the damaged plaster area to assess the extent of the repair needed. Use a putty knife or scraper to gently remove any loose or crumbling plaster, ensuring the edges around the damaged section are clean and stable.
Next, clean the area with a damp cloth to get rid of dust and dirt. Make sure the surface is dry before moving on to the next step. Now, it's time to prime the area with a suitable primer for plaster to promote adhesion and prevent further damage. Once the primer is dry, you are ready to begin patching the damaged plaster. Remember, a thorough preparation process will contribute to a successful and seamless repair.
Patching large holes in plaster walls involves a systematic process of cleaning, creating a backing, applying plaster or joint compound, and smoothing the patch to seamlessly blend with the surrounding surface.
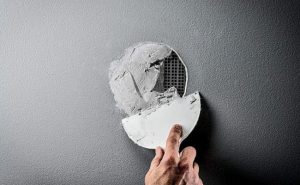
First, begin by cleaning the area around the hole, removing any loose debris and dust. Once clean, create a backing by attaching a piece of mesh or hardware cloth to the inner edges of the hole. This backing will provide support for the new plaster or joint compound.
Next, mix your chosen plaster or joint compound according to the manufacturer's instructions. Apply the compound evenly over the backing, ensuring it fills the hole completely. Use a trowel to smooth the surface and feather the edges to aid in blending.
After the patch has dried, sand it down gently to achieve a seamless finish. Blending the patch with the surrounding wall is crucial for a professional look; use a damp sponge to feather the edges and match the texture of the existing surface.
Begin the repair process by thoroughly cleaning the damaged area on the plaster walls to remove dust, debris, and loose particles that could affect the adhesion of the patching material.
Proper cleaning is essential to ensure that the patching material adheres correctly to the surface, preventing future cracks and ensuring a seamless finish. Debris-free walls provide a smooth canvas for repair work, allowing the patch to blend in seamlessly with the existing structure. By eliminating any dirt or residue, you create a strong bond between the patch and the wall, increasing the longevity of the repair. Take your time to clean meticulously, using a soft brush or vacuum to remove all traces of dust and grime.
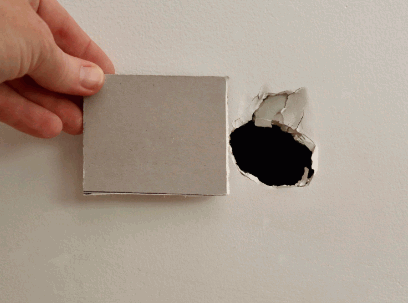
Carefully cut out the damaged section of the plaster walls using a suitable tool to create a clean and defined area for the repair patch to adhere securely.
To begin, gather essential cutting tools such as a utility knife, plaster saw, or oscillating multi-tool with a carbide-tip blade. Depending on the extent of damage, assess whether a straight cut or a more intricate shape is required. Precision is key to ensure that only the damaged portion is removed, preventing unnecessary removal of intact plaster. Mark the cutting lines using a pencil or masking tape to guide your cuts.
When cutting, apply gentle pressure and work slowly to avoid splintering or chipping surrounding areas. Angle the tool slightly towards the wall to create a slight bevel along the edges, aiding in a seamless patch application later.
Establish a sturdy backing for the patch by installing support material such as fiberglass mesh or wooden lath behind the hole in the plaster walls to ensure stability and reinforcement.
Creating a reliable support structure behind the damaged area is crucial for a successful plaster wall repair. Reinforcing the patch with the right backing material not only strengthens the repair but also prevents future cracks and damage. Fiberglass mesh is a popular choice due to its flexibility and ability to adhere well to the plaster surface. Alternatively, wooden lath provides solid support, especially for larger areas needing repair. By anchoring the backing securely to the surrounding wall, you ensure that the patch integrates seamlessly into the existing surface.
Mix the plaster or joint compound according to the manufacturer's instructions and apply it evenly to the prepared area, ensuring full coverage and smooth blending with the surrounding surface.
Consistency is crucial when it comes to mixing the plaster or joint compound – strive for a perfect balance of water and compound for optimal results. Take your time while applying the mixture, spreading it evenly with a trowel to avoid bumps or uneven areas.
Work in small sections and feather out the edges to ensure a seamless transition between the repaired area and the existing wall. Be patient as smooth blending with the surrounding surface is essential for a professional finish.

Smooth out the applied patch using a trowel or spatula to achieve a seamless finish, blending the repair with the surrounding plaster walls for a uniform and aesthetically pleasing result.
Start by feathering the edges of the patch with the tool, ensuring a gradual transition from the repaired area to the existing surface. Apply a thin layer of joint compound over the patch, extending it slightly beyond the repaired section.
Once the compound is dry, lightly sand the area to smooth out any roughness and create a perfect integration between the old and new surface. Take your time during this process to achieve flawless seamlessness across the entire wall.
Finishing and painting the repaired area on plaster walls involves sanding the patch, priming the surface, and applying suitable paint or wallpaper to match the existing decor.
Once the patch has been sanded smooth and any imperfections have been addressed, it is essential to prime the surface before painting. Priming creates a smooth and uniform base for the paint to adhere to, ensuring better color coverage and durability. Choose a high-quality primer designed for plaster walls to seal the surface and prevent the paint from soaking in unevenly. After allowing the primer to dry completely, it is time to select the perfect paint color or wallpaper that complements the room. Consider the lighting in the area to pick a shade that will enhance the overall ambiance.
Gain insights: How To Paint Plaster Walls
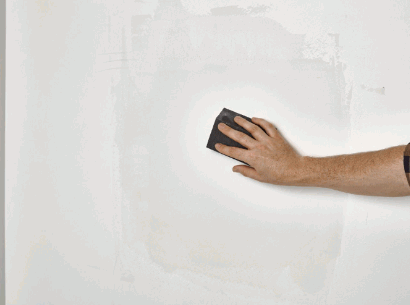
After the patch has dried, gently sand the area to smoothen any rough edges or imperfections, preparing the surface for priming and painting.
Using fine-grit sandpaper, such as 120 to 150 grit, sand the patched area in a circular motion to achieve a uniform texture. Ensure to feather the edges of the patch with light pressure to blend it seamlessly into the surrounding wall. Check the surface frequently by running your hand over it to detect any remaining bumps or inconsistencies. Smooth and even finishes are crucial for a flawless paint job, as they provide a clean canvas for the primer and paint to adhere properly.

Apply a coat of primer to the repaired section to enhance adhesion and ensure uniform paint absorption, creating a suitable base for the final painting process.
Priming the repaired area on plaster walls before painting plays a crucial role in achieving a professional and long-lasting finish. The primer acts as a protective barrier, sealing porous surfaces and preventing the paint from soaking into the substrate unevenly. This process not only enhances paint adhesion but also promotes color consistency, ensuring that the final coat looks smooth and flawless.
By using high-quality primer products specifically designed for plaster walls and following the correct application methods, you can significantly improve the overall durability and appearance of your paint job. Proper priming also helps to hide imperfections, such as patches or repairs, creating a seamless transition between the original surface and the newly painted area.
Select a suitable wall paint or wallpaper to match the existing decor and carefully apply it to the repaired section, ensuring a seamless integration with the surrounding walls.
When choosing the paint color, it's essential to take into consideration factors like lighting and the overall ambiance of the room. Color matching plays a crucial role in achieving a cohesive look, so it's advisable to test a small patch first to ensure the perfect match.
For a flawless finish, opt for high-quality paint brushes and rollers to blend the new paint seamlessly with the old layers. Feather the edges of the repaired area gently to avoid any visible demarcation lines.

When repairing significant holes in plaster walls, it is advisable to work in layers, allow sufficient drying time between coats, and use quality materials for a durable and visually appealing finish.
Working in layers helps to build up the repair gradually, ensuring a smooth and seamless result. Patience is key when it comes to allowing each layer to dry thoroughly before applying the next one. This not only promotes better adhesion but also prevents cracking or bulging.
Quality materials are essential for a long-lasting repair. Choose a high-quality patching compound that matches the texture of the existing plaster for a cohesive look. Investing in good tools, such as a taping knife and sandpaper, can make the job easier and more precise.